Do you want to get your feet wet by building a quick RPA bot? Here is a quick UiPath Tutorial.
The best way to start is by Automating something useful for you. Learning to do RPA was hard for me until I actually started doing real use cases. From there it was easy to go back and learn the Automation puzzle pieces (like UiPath activities) you need.
Here is an interesting RPA project to get you started. This should take you around 20 minutes to complete. Each of the steps is broken down into a few actions in a video of about 1 to 2 minutes. So hopefully, you can follow through and get to your bot in less than 20 minutes.
As shown in the diagram on top, you would enter data into an Excel Timesheet and invoke the bot using “Cntrl + T”. The bot will then read the Timesheet data and input it into the Apptivo Timesheet system.
Sounds simple? Let us create an Attended bot in this UiPath Tutorial to carry out these steps. So, let us start by installing UiPath.
Install the tool for the UiPath Tutorial
Go to the UiPath Community edition home page and follow the steps in this 1-minute video to install UiPath.
Now that we have our UiPath Studio ready, let us do some groundwork for the automation.
UiPath Tutorial Groundwork
Let us create the spreadsheet and get set up on the Timesheet application before we start on the project.
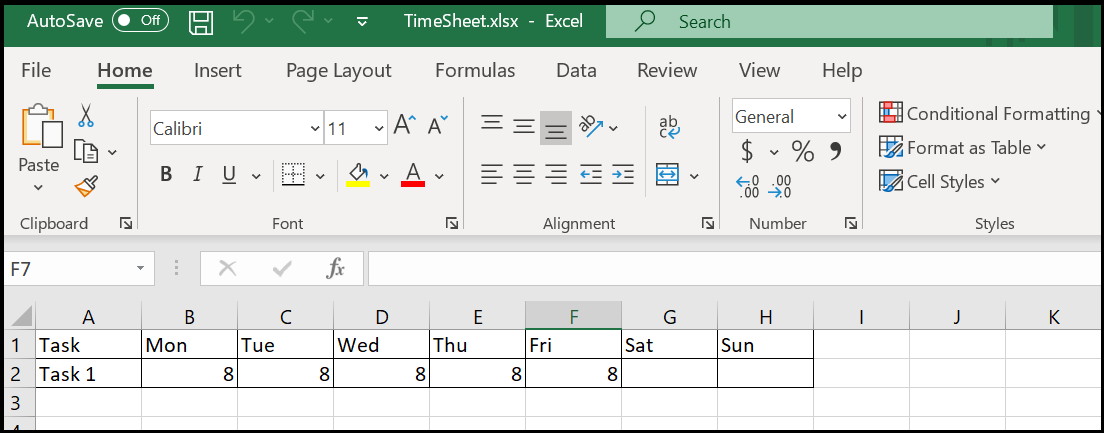
First, create a spreadsheet with the below format. You can also download and use my spreadsheet (right-click and save)
Next, let us also sign up for the Apptivo application. Go to Apptivo.com and sign up. Once you get in, you should see an interface like this. The Timesheet is under “Project Management” (menu on top).

Create Attended Automation Project
Let us first create our project using the UiPath “Trigger Based Attended Automation” template. It gives you a basic template to build Attended automation. Follow the steps in this quick video and you will be all set.
So, we set a trigger to start our Automation – “Alt+ T”. That was pretty simple so far, right?
Now let us get to the meat of the Automation. We will start by reading the spreadsheet.
Reading the Timesheet entries in Excel
Here we will use UiPath Excel activities to read the spreadsheet and store the data in a DataTable variable. The variable as we know is a place to store data and Datatable is used to store big pieces of information like the spreadsheet data in this case. We will also add a Try-Catch activity to handle any exceptions – we will start with that in another 1-minute video.
So, we now have all the Timesheet data read and stored in our DataTable. We did that to iterate or step into each data row in the DataTable and input the data into the Timesheet Application. Let us do that now.
Creating the Timesheet in Apptivo Timesheet
We have made it to the last part of the Automation! This part is a little bit harder than the rest. Here we will use a Web recorder to record the steps to input the data into the Apptivo application. We will record by inputting a few dummy values and then change that to code that takes data from the DataTable and inputs into each of the Timesheet boxes.
Ensure that you have the Apptivo application open and signed in on your Chrome browser. Let us start by setting up the DataTable Iteration in another quick video.
As we said, there is some code we need to add to update the values. The code takes the data for each column from the row and converts it into a string.
For eg. For reading the Task column, the code is row("Task").ToString. (Read the “Task” column in the row and make it a String)
Similarly, the first day of the week (Sunday) is read using the code row("Sun").ToString
You can replace “Sun” in the above code with Mon, Tue, Wed, Thu, Fri, and Sat to read all the other columns from the Timesheet.
Did you get through fine? Sometimes the web recorder may be a bit tricky. If there are issues, try recording again. If you still have issues, leave a comment or drop me a line.
Hopefully, you could build the bot. Let us run the automation and test it now.
Running the Automation
Let us now take our Automation for a spin. Go ahead and run the Automation from the Studio.
If you did everything right, it would take data from your spreadsheet and create entries in the Apptivo Timesheet application.
Try adding another task with hours in your spreadsheet and run again. It should create two Timesheet entries in the application.
If you do Timesheet entry every week, you can try it out on your application as well. If you are starting out though, I would suggest that you follow this UiPath Tutorial as-is and then take up the part of customizing for your application.
How was the UiPath Tutorial? Were you able to follow along and build the bot? Appreciate it if you can share your experience in the comments.👇
Nice, what about doing it in Studio-X ?
Thanks Steen. Good idea and will plan to make one with Studio x as well.